IntraVersion
Open-Source Document Management System...
IntraVersion (IV) is a multi-user, version control system.Which can store unlimited versions of all your important Files: fromtext-documents to images - any type of file can be stored in IV.
It can be used as:
- An Intranet Management System - allowing effective file sharing within your business
- A Software Configuration Management System - allowing software developers to manage their code and build the resulting applications.
IV can be used as a simple intranet document-management system - allowing users to UPLOAD / download and update files. Or by enabling a few options, IV can be used by developers as a software configuration management system - allowing project versioning, file branching and more.
A new 'Publisher' module is 95% complete - allowing thecontents of the repository to be published to the internet - in anskinnable explorer-like interface.
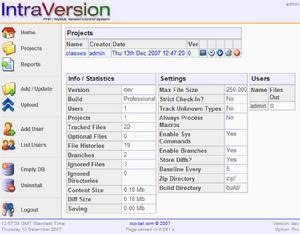
How To Use IntraVersion
Basics
- IV runs on a web server. It can be your local PC, or a remote machine.
- Each user has a 'working directory' - i.e. iv/users/admin where there files are
- Users move files to and from their IV working directory using FTP, or via IV as zip files...
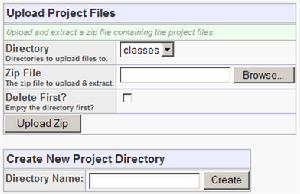
Uploading Files
The easiest way to transfer files between your machine, and IV, is via FTP. We'd recommend FileZilla.
Alternatively, you can upload a whole project into IV as a zip filefrom the Upload page. You first have to create a project directory forthe files to be unzipped into.
You should ensure your zip file doesn't contain any 'extra'directories above the project files before you upload. You can chooseto empty the project directory before the file is unzipped.
You can also upload individual files and create sub-directories from the file-list page.
Load a New Project
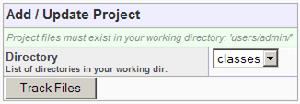
To load a new project into IV, copy the entire directory structureof the project into your working directory, then go to the 'UpdateProject' page. Select the directory from the drop-down list, and click'Update'.
This will create a new project with the same name as it's root directory.
For projects with loads of files: If PHP times-out while importing aproject, you can simply refresh the page (Update Project), and it willadd the remaining files the next time around. If it keeps timing out -you can increase the default page timeout in settings.php.
Update A Project
to update any files in a project, ensure the updated files are inyour working directory, go to 'Update Project'. Select the directoryfrom the drop-down list, and click 'Update'.
You can also update projects directly from the 'Projects' page (click the 'Update' icon).
IV will only check the files that are there (in your workingdirectory)... All the files that are in the directory will be checkedfor changes and updated. Any new files will be added.
You can also upload and update individual files directly - from the File List page.
If a file has changed, it's version will be incremented, and the newcontents stored in the DB. If a file is checked-out to another user, anerror will be generated, and the file will not be updated.
Note: IV checks for changes in files by computing a checksum (MD5)of the file's contents and comparing it with the stored checksum forthe last version of the file.
As of V1.09, IV also stores and checks the MD5 against the entirehistory for the file, and if it finds a match - the update is abortedwith the message "This file looks like old version 'x'".
File Update Messages / Errors
This is a list of all the different messages you might get when updating a file:
| Message | Description |
|---|---|
| File Added | New file added ok |
| No Change | File unchanged |
| Updated to Version ... | File changed, and updated to version... |
| File does not exist | File failed 'file_exists()' test (should never happen) |
| File is not tracked | File has been 'Stopped' |
| File is a directory | File is a directory (should never happen) |
| Cannot read file, permission denied | File access denied by operating system. |
| You don't have this file checked out! | If STRICT_ACCESS is TRUE, you have to check files out before you can update them. |
| File is checked out to another user | STRICT_ACCESS is TRUE, and the file is checked-out to another user |
| File looks like old version ... | The file's MD5 is the same as a previously stored version. The file will not be updated. |
| File is too big - ignored | File exceeds MAX_SIZE setting. |
| Unknown file type - ignored | File type (extension) is not defined in inc/ft_array.php and TRACK_UNKNOWN_TYPES is FALSE |
| Unknown error | An unknown error has occurred. |
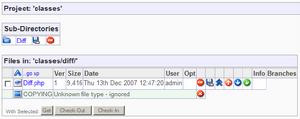
Viewing Project Files
When you click on a project name in the list of projects, you'retaken to the 'File List' page. This shows any files ⊂-directories defined.
Sub-directories can be renamed, and moved. They can also be'stopped' - see below 'Stop Tracking Files / Directories' for moreinfo. Clicking on a sub-directory takes you to the file-list for thatsub-dir.
Files can be renamed, moved and 'stopped'. They can also be uploaded, updated, got and checked-out from the file-list page.
Clicking on a file takes you to the 'View File' page...
The File View Page
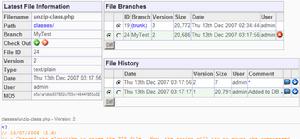
This page show the latest details, branches and history for a file.
Latest details are on the left. You can checkout /checkin / updatethe file from here. If the file is already checked-out, it will givethe name of the user it's checked out to. If the file is a branch, itwill say so.
All available file branches are listed on the right at the top.Click on the branch name to view it. Once you are viewing the branch,you can get / update it as normal.
You can see the differences between different versions of a file, orthe differences between the latest versions of two branches. Simplyselect the files to compare, and click the 'Diff' button.
You can delete branches directly from this page by clicking the 'Delete' icon next to the branch.
Get / Checkout Files
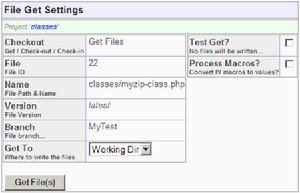
To get or checkout files from a project, you can either select theindividual files from the file-list, or get the whole project...
When a file is checked-out it' effectively 'locked'. It can be 'got'by any user, but can only be updated / checked-in by the user who hasit checked-out.
To get individual files from the file-list, you can either click the'Get' (or 'Checkout') icon for a single file, or tick the checkboxes onthe left, then click the 'Get' (or 'Checkout') button for multiplefiles.
You can get file to: 1) Your Working Directory, 2) The Build Directory, or 3) A Zip File.
'Test Get' prevents any files being written (used for test purposes).
'Process Macros' convert IV macros to the appropriate values. Forgetting code for development purposes, this can be left OFF, forgetting code for production, it should be ON.
See below for details on getting whole projects.
Renaming & Moving Files & Directories
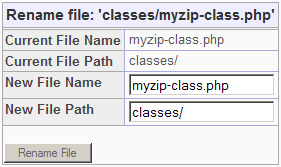
You can rename and move both individual files and directories by clicking the 'Rename' icon.
Simply enter the new filename and path, and click 'Rename'.
This only changes the current file information, not historical data- so when getting historical projects, the old filenames / paths arepreserved.
Also, when you view historical projects, it will show the file name & directories that existed at the time that version was created.
You must ensure that you remove or rename the file / directory priorto updating the project or the old files will be added again.
Building Projects
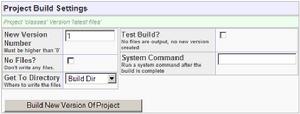
In the 'Projects' page - if you click on the 'Build' icon for a project, you will be taken to the Project Build options...
This allows you to create a new release of a project.
Bear in mind that you can get all the files for any version of anyproject at any time - so it's not important that the files are actuallyoutput at this stage - hence the option 'Create No Files'.
Build Options:
- New Version Number - can be any string, but must be greater than the previous project version (release).
- Create No Files - Disables the writing of projectfiles. This is so you can create a build, then get it separately - forexample if it comes in various options, and you want to get all thefiles as a zip...
- Get To Directory - where to write the files (if 'Create No Files' is off)
- Test Build - will run through and check the build is viable without creating it.
- System Command - run a system command after the build has completed (i.e. 'make').
The build will fail if any files are checked out, or if nothing has changed.
The build process creates the new project version. The current version of all the files in the project are stored.
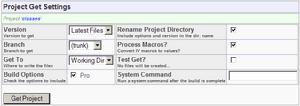
Getting Projects
In the 'Projects' page - if you click on the 'Get' icon for a project, you will be taken to the Project Get options.
This page allows any user to get whole projects with various options...
Get Options:
- Version - Any previous project version (release), or 'Latest Files'.
- Branch - You can choose to get any branch that isdefined in files for this project, or '(trunk)' for the main(production) files. Only one branch can be 'got' at once.
- Get To - where to write the files: Working Dir, Build Dir or Zip file.
- Build Options - (IV Pro only!) any project options youhave defined in the files for this project will be automatically listedhere. You can choose to include any number.
- Rename Project Directory - this will include options and version in the dir. name (e.g. the project directory 'IV' will be written as 'IV_Pro_1.04')
- Process Macros - Convert IV macros to the appropriate values. If you are getting a project for distribution you should set this ON.
- Test Get - no files will be written.
- System Command - run a system command after the build has completed (i.e. 'make').
When distributing your projects, you should set 'Rename ProjectDirectory' ON, 'Process Macros' ON, and we like the 'Get To' to 'ZipFile' option because we can use the distribution file in that form.
Stop Tracking Files / Directories
You can stop a file or directory from being tracked by IV by clicking the 'Stop' icon.
If a file/directory is not being tracked it's content is not stored, and it is not included in builds and gets.
You can re-start tracking on a stopped item by clicking the 'Start' icon.
Deleting Files / Directories
Once a file/directory is stopped, it can then be deleted. Clicking the 'Delete' icon brings up a confirmation box.
Files that have been included in project releases can only bedeleted by someone with 'admin' access. Other wise anyone with'developer' access can delete a file.
Direcories can only be deleted by someone with 'admin' access.
Note: Files with branches must be deleted individually - i.e.the trunk is deleted first, then you have to keep clicking 'Delete'until all the branches of the file have been removed.
File Branching
Branching allows you to store multiple copies of the same(source-code) file in IV. This allows you to develop variants andprototypes of code without affecting the main development files.
Main files are called 'trunk' files - i.e. not a branch. Onlytrunk files are ever included in project builds. Branches are neverincluded in builds - they are for development purposes only.
A file is defined as belonging to a branch by including this directive in the file:
IVBRANCH:Branch Name
Files with branches are shown as follows:

- File 1 (myzip-class.php) - This file only exists in branch 'MyTest'
- File 2 (unzip-class.php) - This file has a 'trunk' version, and a version for the branch 'MyTest'.
- File 3 (myzip-class.php) - This file only has a 'trunk' version.
You can get a whole project branch - see the section on Getting Files above.
Output Macros
You can insert the following macros in your source code, and whenthe file is OUTPUT (i.e. via File or Project GET/BUILD/CHECKOUT) themacro will be replaced with the appropriate value.
Note: as of V1.02, macros are only processed on project gets /builds, NOT file gets. This is because the info they provide is onlyuseful in released code. It saves some processing time too..
If you want macros to be processed on all file gets, set $ALWAYS_PROCESS_MACROS=TRUE; in settings.php
- IVTIME - Time and Date Stamp
- IVVER - File Version
- IVFILE - File Name
- IVPATH - File Path
- IVPROJ - Project Version (Text)
- IVPRJV - Project Version (Code)
The following values relating to macros are defined in settings.php:
- The macro delimiters ($MD_L and $MD_R) are set to '//#' and '#' by default.
- The output macros - i.e. what the text above is replaced by.
- ALWAYS_PROCESS_MACROS - See above.
- TIMESTAMP_FORMAT - The format to use to output the timestamp macro.
Example
In IV, the comment at the top of the file is written thus (this is from settings.php):
// //#IVPATH#// //#IVFILE#
// //#IVVER#
// //#IVPROJ#
//===============================================================
//#IVPRJV#
When the file is retrieved from IV, the comment is changed to this:
// [ File_Path: iv/ ]// [ File_Name: settings.php ]
// [ File_Version: 2 ]
// [ Project_Version: 0.1 ]
//===============================================================
$VERSION="0.1";
When the files are updated or checked-in, the macros are reverted back prior to the comparison / update. When you look at the file in IV, they only show the original macro (i.e. //#IVFILE#)
Other Info
File Types
By default, IV will ignore any file extensions it does not recognise. These are defined in the file: ft_array.php. You can to edit the file to add / remove any extensions you need / don't need.
You can get IV to track unknown file types by changing the value of TRACK_UNKNOWN_TYPES in settings.php to TRUE
User Access Levels
There are 5 access levels in the system (defined in userlevel.php):
These features were included in the 'Pro' build. They're now included as standard...
File & Directory Level Permissions
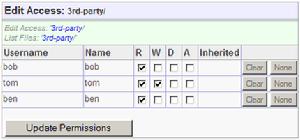
You can define whether each user can READ, WRITE and DELETE individual projects, directories and files.
To edit access for an item, click the access icon (keys). The 'EditAccess' page will appear listing All Users in the system, withcheckboxes for R, W, D (and 'A' - this is for APPROVE - which isreserved for workflow enhancements in the future).
Simply tick the boxes for the required accesses, and click 'Update'.
Inherited access (from directories higher up) is shown in the list, and as coloured borders around the checkboxes.
Project Options
A single project may be released with different packages of files -for example, IV has 'Standard' and 'Pro' options. Intraversion has avery simple, but powerful mechanism for managing this.
Defining Optional Files
There are two ways to define which files are included when a particular option is selected:
Where 'Pro' can be a comma separated list of options (e.g. 'Standard,Professional,Enterprise').
File options are version specific - so files may change option during the life of a project.
Defining Optional Directories
In the file-list page, you can click the 'Optional File' icon for the directory - and set the options there.
Directory options are NOT version specific - so options set for a directory should not change during the life of a project.

Viewing Optional Files
Every time a file is updated, any options specified like this are noted. The file option info is then visible in the file list.
In this example the file 'zip-class.php' is only included in 'Pro' version of the product.
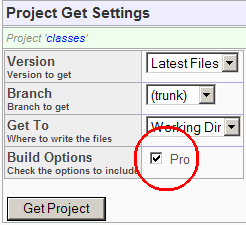
Getting A Project With Options
When you choose to GET a project, you'll automatically be presentedwith a list of any options you have defined, and you can choose toinclude any, or all...
In this example the 'Pro' version of the product is selected, and it's files will be included.
Project Options Macros
Project Options: Text
The options chosen can be included in the output files using the macro: //#IVOPTION#
...Which is converted into the text defined in the variable '$MO_PROJECT_OPTION' in settings.php.
Which will be replaced with something like [ Build_Options: Pro ]
Project Options: Code
The options chosen in the GET can be fed back into the output files using the macro //#IVOPTIONC#
...Which is converted into the code defined in the variable '$MO_PROJECT_OPTION_CODE' in settings.php.
The default options convert the macro into this PHP code:
$OPTION="Pro";
...Which allows the software to know what option(s) it was built with...
Note: Options are not processed for file branches, only for the main (trunk) file.
File Differencing
IV can store files either in-full, or, it can store only thedifferences between them... There are advantages to both approaches,but when you're managing a lot of projects &/or versions, thesaving on database space is considerable.
For example: If you have a 10K text file, and delete one line in it- the new version will occupy 10K of database space in full, or about12bytes as a diff...
On the Home page, IV shows you how much disk space would be used ifall the files were stored in full, how much space is actually taken,and the saving.
Baselines
Baselines are where the full file contents are stored. The firstversion is always a baseline, and subsequent versions are built byapplying the diffs to that.
The system will set baselines according to the value ofBASELINE_EVERY (settings.php). For example, a value of 10, will meanthat every 10th version is stored in full.
The reason for this is to minimise the amount of processing requiredfor getting projects after they have been through many versions...
If, for example, your project contained 1000 files, which had beenthrough 100 versions each. Then with a single baseline - 100,000 rowsof data would have to be fetched, and 99,000 diffs would have to beapplied.
If the baseline is set at 10 versions, then a 1000 file project would never require more than 10,000 rows, and 9,900 diffs.
File Diff Options (settings.php)
- STORE_DIFFS - Default is TRUE. If TRUE, IV will store onlythe differences between files, not the whole file contents. Thissetting MUST NOT be changed after files have been added to the system.
- BASELINE_EVERY - Store a full copy of file data every n versions.
Reports
The reports engine is built, but as of 29/11/2007 there are only 2test reports in there... If anyone needs particular reports, I'll buildthem asap.
Reports Engine
Reports are defined in the file inc/report-defs.php.
The functions which generate the data are defined in the file inc/report-func.php.
More info on this is planned...
摘自:http://top-cat.com/iv-manual.php